It is vital to understand the overall performance of a liquid ring vacuum pump will depend on the regular maintenance and installation.
That is the main reason why we created guidelines that will help you deal with any liquid ring vacuum pump that you can find on the market.
Of course, we recommend you to check out the manufacturer’s guidelines from the user manual before you finish with the installation.
In the further article, you will learn more about the installation and uses of a liquid ring vacuum pump.
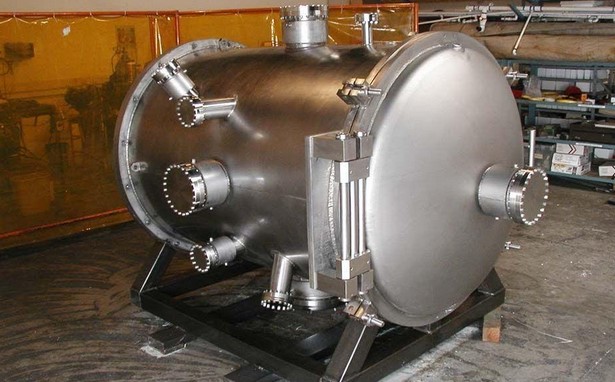
Liquid Ring Vacuum Pump Installation Tips
- Be Careful While Unpacking – The first thing that you should do is to unpack all components you received so that you can install everything correctly. It would be best if you were as careful as possible for all parts. It is vital to use the even and flat surface with plenty of space to set all items you got within the package. In case you mishandle anything during the packing process, that may lead to installation problems. In case you have a pump that you should attach to a baseplate, we recommend you lift the assembly by using the base and not the pump. Besides, it would help if you made sure that there are no slings or hooks attached because they can also cause severe installation problems.
- Power It Up When Fully Assembled – After unpacking, most people think that pumps are ready to plug and use, but that is not the case. Taking a test run can prove to be a severe problem. It would be best to start with the operation only when you install it entirely and set the proper liquid you wish to use. You should check here to learn everything about converting tire inflator into a vacuum pump.
- Safely Store – You need to make sure to protect the unit by following particular tips and rules. For instance, you should store it in a place where the temperature is moderate. The worst thing that you can do is to place it somewhere where the temperature is fluctuation and can quickly drop below freezing because that could affect the sealant liquid.
- Setting Up – Even though most of the units tend to ruin slowly and smoothly, you need to place them on stable and robust surfaces. The best solutions include concrete mounts or floors. In case you have bought a small vacuum, you can also place it on a skid or floor. On the other hand, if you got a large one, you should place it on a concrete pad.
- Align and Install the Sheaves – If you have a pump that is using V-belt, you should both align and install the sheaves before you decide to set the tension to the belt. Only when you finish with the alignment, you should place the belts over them into the grooves.
- Piping – You need to be sure that both joints and pipes are perfectly aligned and without stress. Remember that in factory settings, these parts have to be tested at least a few times, but problems may happen during the shipping, which is something you should remember.
- Belt Tension – After you finish with the rest, you should check out the tension of belts and do it so at least once in a few hours after usage. In case the tension falls, the vacuum will start to make squalling noises while operating. If you wish to shut it down for an extended period, we recommend removing the belts to prevent them from wearing down.
- Check The Heat – You should always avoid operation in moisture environments, especially if the temperatures can reach a higher number than 140 degrees F. Even though liquid ring vacuum pumps and robust and can stand the test of time, hot temperatures can wear away the belts, which will make them useless. Simultaneously, you should avoid coating the sheaves by using oil, which will also affect the rubber belts used for the process. Finally, avoid mixing various types of belts, because that may lead to an unbalanced operation. Instead, it would help if you always used the matching belts to maintain the proper efficiency.
- Prepare Piping – The most critical part of liquid rung pumps include the steady supply of liquid, which is, in most cases, water. The idea is to place it into the vacuum by using a pump to connect to a casing. You can find three different designs, including partial recovery, closed-loop, and once through. Each one of them requires a liquid source, flow shutoff, flow regulator, and liquid/gas separator, among other things.
- Connect the Pipes – You should clear the openings of any debris and dirt, take the cover from them and connect the piping you got within the package.
- Check For Flange Holes – At the same time, you need to align flange holes because they should be free of strain and fit into a place with ease. When you buy it, throughout the first few weeks of using, you should implement a protective mesh on the inlet to increase its effectiveness.
- Power It Up – Finally, you should connect the power cord by using a power supply. You should check out its performance when you turn it on. At the same time, you should check out the user manual to see whether everything goes according to plan.
Maintenance Tips
Even though they are long-lasting, robust, and high-powered devices, they still have limitations. That is the main reason why you should check out how it behaves because that could be an indication that you have trouble with it.
The best way to do it is by comparing the current conditions with the ones you had first. For instance, you should see whether the temperature is the same, whether the system is under higher stress or pressure.
Check out if the gas composition is the same, or it changed due to problems with the liquid inside. If you wish for the liquid vacuum pump can run efficiently, you should determine whether it has air leaks.
You probably understand why air leaks can cause problems due to energy waste and the inability to maintain overall efficiency.
Check out this video: https://www.dailymotion.com/video/x2pnwp3 to learn how to make homemade vacuum pump.
If you wish to make sure that a pump does not have air leaks, you should conduct an Ultrasonic leak-detector test, in which vibrations that come from leaks will notify you as alarm sounds.